tsunami udp file transfer
這星期工作需要把一個巨大的文件整個從 aws 的一個 region copy 到另外一個 region 去。
(其實一個 os 的 dump。只是牽涉到 china region ,受到某 “結界” 的限制導致
不能用 aws 自己的工具 copy。)
爲了加快這個 copy 過程,特意去咨詢了一下 aws 的 supporter。 推薦了這種 udp transfer 的方式在 aws 的 Regions / Availability Zones (尤其是 AZ ) 間 會發揮出最大的帶寬優勢。
- aws 的 regions 是指不同地區的機房如 aws China, aws US East
- aws Availability Zones 是指同一地區的不同機房中心,考慮容災需要如斷電,洪水, 同一城市會在相距 N 公里的地方建立 2 個以上的 Availability Zones.
由於 udp 本身比 tcp 快,只是有丟包的缺陷。
- 如果是在 aws Availability zones 之間基本是光纜直鏈。丟包率應該好于 Internet。
- 即使是 Regions 閒用的是 Internet 鏈路,udp transfer 工具本事也有失敗重發, 應該也是好于用 ftp / http / scp 之類的工具去傳送的。
tsunami udp - http://tsunami-udp.sourceforge.net/
就是為這樣一個網絡環境而實現的簡單文件傳輸工具。(它有點像 tftp 不過實現更簡單些)
tsunami 這個詞好像是出自日語,應該是海嘯之類的意思。
它的基本原理也比較形象,一旦開始傳輸就會有一般的 udp 包沖過來,當然不少包是被 “浪費” 掉的。
下面列一下, 基本原理,基本使用和常見問題。
基本原理
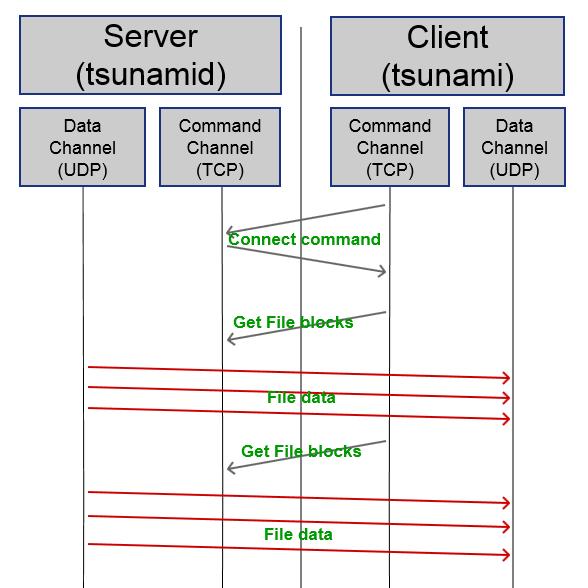
tsunami 的基本原理和 FTP 的 passive mode 基本一樣。總共有 2 條鏈路:
- 控制鏈路 (tcp) - 用于傳輸 client -> server 的 command
- 數據鏈路 (udp) - 用于傳輸文件數據 server -> client 。(有 client 監聽, server 來連)
如下圖:
- Client (tsunami) 通過 tcp command channel 連接到 server ,告訴 server 需要的 file blocks
- Server (tsunamid) 通過 client 發過來的命令的 client 的 udp 端口, 並且把文件按 file blocks 發送到這個 udp 鏈路上。
- Client 收到數據后,會合併數據到對應文件。如果有失敗丟包,則再讓 server 發送一次。
基本使用
安裝
可以從 source code 安裝 tsunami。
- 環境中必須已經有 gcc; install; make; automake 這些工具。如果沒有則需要先用
apt-get安裝。 - 下載 tsunami 比如:
wget 'http://sourceforge.net/projects/tsunami-udp/files/tsunami-udp/tsunami-v1.1-cvsbuild42/tsunami-v1.1-cvsbuild42.tar.gz/download' -O tsunami-udp.tgz - 解開
tsunami-udp.tgz后用,recompile.sh隨用用sudo make install來安裝。 ( 在有些系統上 build 可能失敗/出錯,原因是automake失敗了。需要修改 recompile.sh 把automake變成automake --add-missing)
安裝之後會有 tsunamid (server) 和 tsunami (client) 這兩個部分。
- tsunamid 是 file transfer server 在 copy 的 source 機器上啓動它。
- tsunami 是 file transfer client 在 copy 的 destination 機器上啓動它。
tsunamid
啓動 file transfer server 比如: tsunamid --port 8081 --secret xxx file1 file2
表示在 port 8081 上啓動 tsunamid,傳輸 file1 和 file2。 secret 指定的是連接
口令。
tsunami
tsunamid 啓動后,便可在 destination 機器上用。tsunami 來 download 。
直接 tsunami 啓動 tsunami client 進入 client 的交互模式。
進入 tsunami client 交互模式后用 connect 命令連接 tsunamid 用 dir 查看
可下載文件列表,用 get 命令下載文件。比如:
tsunami啓動 clientset passphrase xxx來設置 client 連接口令。(就是tsunamid啓動時,--secret指定的)set udpport 9992設置 client udp port 到 9992。connect localhost 8999連接到本地 tsunamid。dir列出下載文件列表。get *下載所有文件。
-> % tsunami
Tsunami Client for protocol rev 20061025
Revision: v1.1 devel cvsbuild 42
Compiled: Jul 21 2015 12:12:26

tsunami> set passphrase xxx
passphrase = <user-specified>

tsunami> set udpport 9992
udpport = 9992

tsunami> connect localhost 8999
Connected.

tsunami> dir
Remote file list:
  1) testdata        372387803 bytes

tsunami> get *
常見問題 (坑)
Ports
tsunami 的工作方式和 FTP passive mode 是異曲同工。共牽涉 2 個 ports (分別在 client 和 server 端)。
- client - > server 的 tcp 命令端口。(default: 46224)
- 這個端口是
tsunamid在啓動時打開的必須保證在, source server 上打開這個 tcp port。 - 如果是雲端機器,比如 aws 上注意在 security group 裏打開對應的 tcp port
- 如果不能使用 default 的 46224,則用
tsunamid --port <port number>來指定 server 的 port。 在 client connect 時用connect <remote ip> <remote port>來指定 port.
- 這個端口是
- server -> client 的 upd 數據端口。 (default: 46224 )
- 這個端口是
tsunami在下載文件前開啓的 udp 數據接收端。請注意在 destination server 上打開這個 udp port。 - 如果是雲端機器,比如 aws 上注意在 security group 裏打開對應的 udp port (注意這裏需要打開 upd 規則)
- 如果不能使用 default 的 46224 則在
tsunamiclient 中用set udpport <port number>來改變默認值。 - 如果 client 在家裏,用路由器上網,可能需要在路由器上設置端口專發規則。
- 這個端口是
specifies the shared secret
這個可能是最坑的地方。(因爲和 tsunami 手冊中說法不一樣)
由於當時在 Internet 上傳數據,下意識的設置了 password。但是設置后怎麽連不上。
手冊中的説法如下: After connecting, you will be prompted to enter a shared secret for authentication.
tsunami> help connect
Usage: connect
       connect <remote-host>
       connect <remote-host> <remote-port>

Opens a connection to a remote Tsunami server.  If the host and port
are not specified, default values are used.  (Use the 'set' command to
modify these values.)

After connecting, you will be prompted to enter a shared secret for
authentication.
但是我怎麽也等不到,輸入 shared secret 的提示。
后來看了源代碼才得知: getpass 在這個 tsunami-v1.1-cvsbuild42 中被移除了。
這個 client 只能用 set passphrase xxx 來設置 shared secret。
    /* get the shared secret from the user */
    if (parameter->passphrase == NULL)
        secret = strdup(DEFAULT_SECRET);
    else
        secret = strdup(parameter->passphrase);
    // if (NULL == (secret = getpass("Password: ")))
    //   error("Could not read shared secret");
如果也像我一樣無法輸入口令,建議直接使用 set passphrase xxx 來繞過此問題。
最後
- 這種 udp file transfer 並不安全。丟包重發也佔用/浪費大量帶寬。只可以做為一個臨時的方法, 在某些特殊網絡環境,下傳輸一些臨時文件。不可以作爲一個長期服務。
- tsunami 本身缺乏維護,不怎麽更新。如果有人能用腳本語言 (Python, Node.js 等) 實現一份跨平台的版本就好了。(我説不定會嘗試一下,如果比較有空的話)
blog comments powered by Disqus